Sistema a doppio o-ring
Double o-ring system
Durante le fasi di installazione, un passaggio fondamentale
è il taglio del tubo. Utilizzando un tagliatubi Eurotis, la lam
a
va posizionata all’interno delle due corrugazioni e si proced
e
con il taglio fino al completo distacco del tubo. È importan
-
te evitare di strapparlo, accompagnando invece il taglio in
modo graduale e delicato
.
During the installation phases, a fundamental step is cuttin
g
the pipe. Using a Eurotis pipe cutter, the blade should be po-
sitioned between the two corrugations and the cut carried
out until the pipe is completely separated. It is important no
t
to tear the pipe, but to guide the cut smoothly and gently
.
A
E
C
B
D
2
x
F
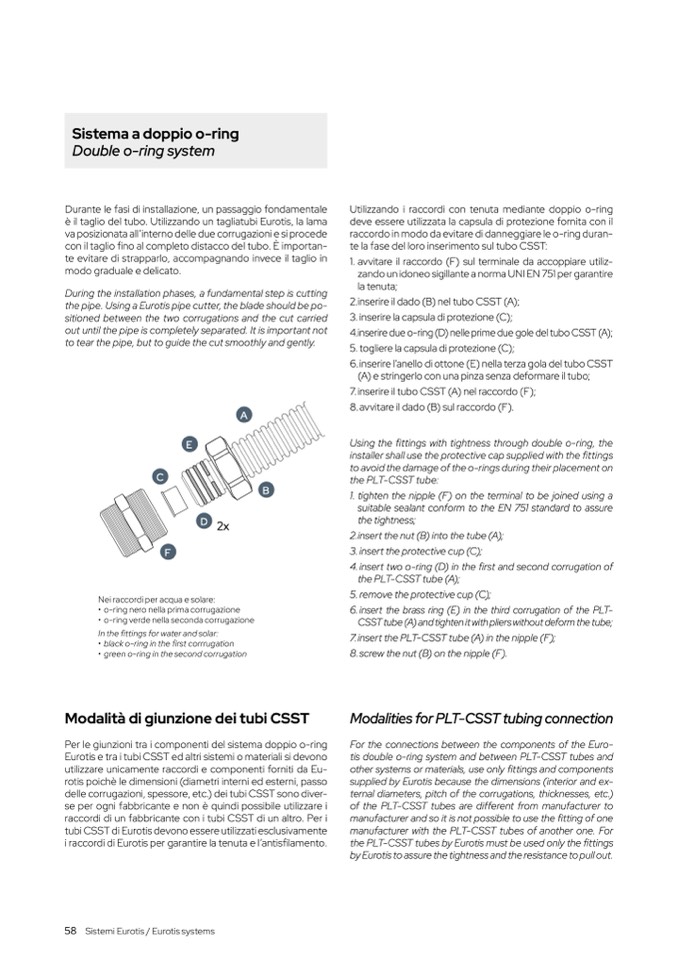
Nei raccordi per acqua e solare:
• o-ring nero nella prima corrugazione
• o-ring verde nella seconda corrugazione
In the fittings for water and solar:
• black o-ring in the first corrrugation
• green o-ring in the second corrugation
Modalità di giunzione dei tubi CSS
T
Per le giunzioni tra i componenti del sistema doppio o-ring
Eurotis e tra i tubi CSST ed altri sistemi o materiali si devono
utilizzare unicamente raccordi e componenti forniti da Eu-
rotis poichè le dimensioni (diametri interni ed esterni, passo
delle corrugazioni, spessore, etc.) dei tubi CSST sono diver-
se per ogni fabbricante e non è quindi possibile utilizzare
i
raccordi di un fabbricante con i tubi CSST di un altro. Per
i
tubi CSST di Eurotis devono essere utilizzati esclusivament
e
i raccordi di Eurotis per garantire la tenuta e l’antis
filamento.
58
Sistemi Eurotis / Eurotis system
s
Utilizzando i raccordi con tenuta mediante doppio o-ring
deve essere utilizzata la capsula di protezione fornita con il
raccordo in modo da evitare di danneggiare le o-ring duran-
te la fase del loro inserimento sul tubo CSST:
1. avvitare il raccordo (F) sul terminale da accoppiare utiliz-
zando un idoneo sigillante a norma UNI EN 751 per garantir
e
la tenuta;
2. inserire il dado (B) nel tubo CSST (A);
3. inserire la capsula di protezione (C);
4.
inserire due o-ring (D) nelle prime due gole del tubo CSST (A)
;
5. togliere la capsula di protezione (C);
6. inserire l’anello di ottone (E) nella terza gola del tubo CSST
(A) e stringerlo con una pinza senza deformare il tubo;
7. inserire il tubo CSST (A) nel raccordo (F);
8. avvitare il dado (B) sul raccordo (F).
Using the fittings with tightness through double o-ring, the
installer shall use the protective cap supplied with the fitting
s
to avoid the damage of the o-rings during their placement o
n
the PLT-CSST tube
:
1. tighten the nipple (F) on the terminal to be joined using
a
suitable sealant conform to the EN 751 standard to assure
the tightness;
2. insert the nut (B) into the tube (A)
;
3. insert the protective cup (C);
4. insert two o-ring (D) in the first and second corrugation of
the PLT-CSST tube (A);
5. remove the protective cup (C);
6. insert the brass ring (E) in the third corrugation of the PLT-
CSST tube (A) and tighten it with pliers without deform the tube
;
7. insert the PLT-CSST tube (A) in the nipple (F);
8. screw the nut (B) on the nipple (F).
Modalities for PLT-CSST tubing connection
For the connections between the components of the Euro
-
tis double o-ring system and between PLT-CSST tubes and
other systems or materials, use only fittings and component
s
supplied by Eurotis because the dimensions (interior and ex
-
ternal diameters, pitch of the corrugations, thicknesses, etc.)
of the PLT-CSST tubes are different from manufacturer to
manufacturer and so it is not possible to use the
fitting of one
manufacturer with the PLT-CSST tubes of another one. Fo
r
the PLT-CSST tubes by Eurotis must be used only the
fittings
by Eurotis to assure the tightness and the resistance to pull out.

