12ISTRUZIONI DI MONTAGGIO
ASSEMBLING INSTRUCTIONS
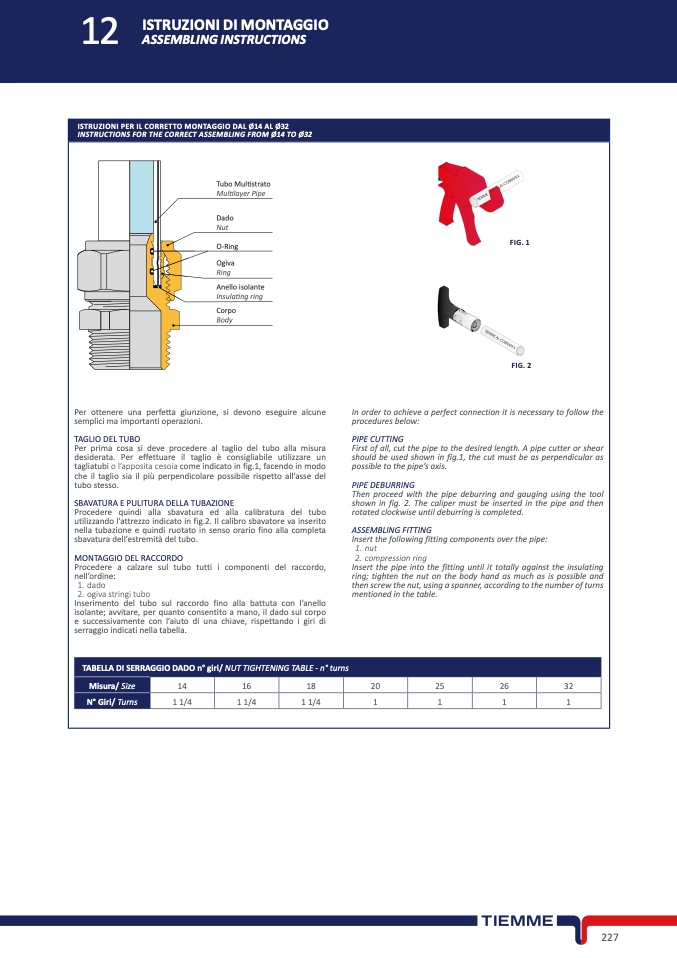
ISTRUZIONI PER IL CORRETTO MONTAGGIO DAL Ø14 AL Ø3
2
INSTRUCTIONS FOR THE CORRECT ASSEMBLING FROM Ø14 TO Ø3
2
Tubo Mul�strato
Multilayer Pipe
Dado
Nut
O-Ring
FIG. 1
Ogiva
Ring
Anello isolante
Insulating ring
Corpo
Body
FIG. 2
Per ottenere una perfetta giunzione, si devono eseguire alcune
semplici ma importanti operazioni.
TAGLIO DEL TUBO
Per prima cosa si deve procedere al taglio del tubo alla misura
desiderata. Per effettuare il taglio è consigliabile utilizzare un
tagliatubi o l’apposita cesoia come indicato in fig.1, facendo in modo
che il taglio sia il più perpendicolare possibile rispetto all’asse del
tubo stesso.
SBAVATURA E PULITURA DELLA TUBAZION
E
Procedere quindi alla sbavatura ed alla calibratura del tubo
utilizzando l’attrezzo indicato in fig.2. Il calibro sbavatore va inserito
nella tubazione e quindi ruotato in senso orario fino alla complet
a
sbavatura dell’estremità del tubo
.
MONTAGGIO DEL RACCORDO
Procedere a calzare sul tubo tutti i componenti del raccordo
,
nell’ordine:
1. dad
o
2. ogiva stringi tub
o
Inserimento del tubo sul raccordo fino alla battuta con l’anell
o
isolante; avvitare, per quanto consentito a mano, il dado sul corpo
e successivamente con l’aiuto di una chiave, rispettando i giri di
serraggio indicati nella tabella.
In order to achieve a perfect connection it is necessary to follow th
e
procedures below
:
PIPE CUTTIN
G
First of all, cut the pipe to the desired length. A pipe cutter or shear
should be used shown in fig.1, the cut must be as perpendicular as
possible to the pipe’s axis
.
PIPE DEBURRIN
G
Then proceed with the pipe deburring and gauging using the tool
shown in fig. 2. The caliper must be inserted in the pipe and the
n
rotated clockwise until deburring is completed.
ASSEMBLING FITTING
Insert the following fitting components over the pipe
:
1. nu
t
2. compression ring
Insert the pipe into the fitting until it totally against the insulating
ring; tighten the nut on the body hand as much as is possible and
then screw the nut, using a spanner, according to the number of turn
s
mentioned in the table.
TABELLA DI SERRAGGIO DADO n° giri/ NUT TIGHTENING TABLE - n° turn
s
Misura/ Size
14
16
18
20
25
26
3
2
N° Giri/ Turns
1 1/4
1 1/4
1 1/4
1
1
1
1
227

