EXTRA THICK
Posa a Secco su Erba
– Dry Laying on Grass • Pose à Sec sur l'Herbe • Trockenverlegung auf Gras • Colocación en Seco sobre Hierba • Сухая
Укладка на Траву
LAYING SOLUTIONS
Istruzioni per la posa a secco su erba
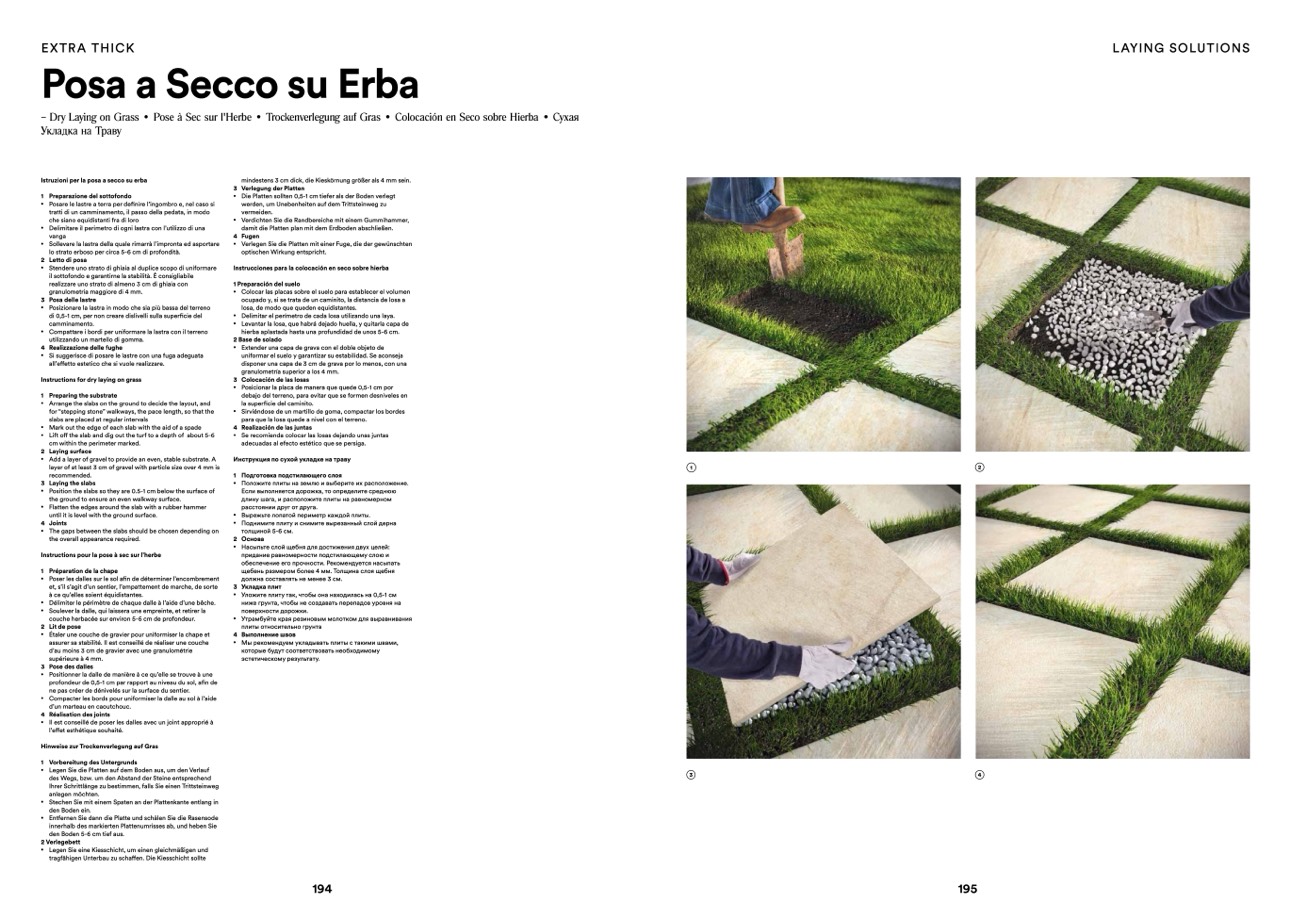
1 Preparazione del sottofondo
•
Posare le lastre a terra per de
finire l’ingombro e, nel caso si
tratti di un camminamento, il passo della pedata, in modo
che siano equidistanti fra di loro
•
Delimitare il perimetro di ogni lastra con l’utilizzo di una
vanga
•
Sollevare la lastra della quale rimarrà l’impronta ed asportare
lo strato erboso per circa 5-6 cm di profondità.
2 Letto di posa
•
Stendere uno strato di ghiaia al duplice scopo di uniformare
il sottofondo e garantirne la stabilit
à.
È consigliabile
realizzare uno strato di almeno 3 cm di ghiaia con
granulometria maggiore di 4 mm.
3 Posa delle lastre
•
Posizionare la lastra in modo che sia pi
ù bassa del terreno
di 0,5-1 cm, per non creare dislivelli sulla superficie del
camminamento.
•
Compattare i bordi per uniformare la lastra con il terreno
utilizzando un martello di gomma.
4 Realizzazione delle fughe
•
Si suggerisce di posare le lastre con una fuga adeguata
all’effetto estetico che si vuole realizzare.
Instructions for dry laying on grass
1 Preparing the substrate
•
Arrange the slabs on the ground to decide the layout, and
for “stepping stone” walkways, the pace length, so that the
slabs are placed at regular intervals
•
Mark out the edge of each slab with the aid of a spade
•
Lift o
ff the slab and dig out the turf to a depth of about 5-6
cm within the perimeter marked.
2 Laying surface
•
Add a layer of gravel to provide an even, stable substrate. A
layer of at least 3 cm of gravel with particle size over 4 mm is
recommended.
3 Laying the slabs
•
Position the slabs so they are 0.5-1 cm below the surface of
the ground to ensure an even walkway surface.
•
Flatten the edges around the slab with a rubber hammer
until it is level with the ground surface.
4 Joints
•
The gaps between the slabs should be chosen depending on
the overall appearance required.
Instructions pour la pose
à sec sur l’herbe
1 Pr
éparation de la chape
•
Poser les dalles sur le sol afin de d
éterminer l’encombrement
et, s’il s’agit d’un sentier, l’empattement de marche, de sorte
à ce qu’elles soient
équidistantes.
•
D
élimiter le périmètre de chaque dalle
à l’aide d’une bêche.
•
Soulever la dalle, qui laissera une empreinte, et retirer la
couche herbac
ée sur environ 5-6 cm de profondeur.
2 Lit de pose
•
Étaler une couche de gravier pour uniformiser la chape et
assurer sa stabilit
é. Il est conseillé de réaliser une couche
d’au moins 3 cm de gravier avec une granulom
étrie
sup
érieure
à 4 mm.
3 Pose des dalles
•
Positionner la dalle de mani
ère
à ce qu’elle se trouve à une
profondeur de 0,5-1 cm par rapport au niveau du sol, afin de
ne pas cr
éer de dénivelés sur la surface du sentier.
•
Compacter les bords pour uniformiser la dalle au sol à l’aide
d’un marteau en caoutchouc.
4 Réalisation des joints
•
Il est conseill
é de poser les dalles avec un joint appropri
é à
l’effet esthétique souhait
é.
Hinweise zur Trockenverlegung auf Gras
1 Vorbereitung des Untergrunds
•
Legen Sie die Platten auf dem Boden aus, um den Verlauf
des Wegs, bzw. um den Abstand der Steine entsprechend
Ihrer Schrittl
änge zu bestimmen, falls Sie einen Trittsteinweg
anlegen m
öchten.
•
Stechen Sie mit einem Spaten an der Plattenkante entlang in
den Boden ein.
•
Entfernen Sie dann die Platte und sch
älen Sie die Rasensode
innerhalb des markierten Plattenumrisses ab, und heben Sie
den Boden 5-6 cm tief aus.
2 Verlegebett
•
Legen Sie eine Kiesschicht, um einen gleichm
äßigen und
tragf
ähigen Unterbau zu scha
ffen. Die Kiesschicht sollte
mindestens 3 cm dick, die Kiesk
örnung größer als 4 mm sein.
3 Verlegung der Platten
•
Die Platten sollten 0,5-1 cm tiefer als der Boden verlegt
werden, um Unebenheiten auf dem Trittsteinweg zu
vermeiden.
•
Verdichten Sie die Randbereiche mit einem Gummihammer,
damit die Platten plan mit dem Erdboden abschließen.
4 Fugen
•
Verlegen Sie die Platten mit einer Fuge, die der gewünschten
optischen Wirkung entspricht.
Instrucciones para la colocación en seco sobre hierba
1 Preparaci
ón del suelo
•
Colocar las placas sobre el suelo para establecer el volumen
ocupado y, si se trata de un caminito, la distancia de losa a
losa, de modo que queden equidistantes.
•
Delimitar el perímetro de cada losa utilizando una laya.
•
Levantar la losa, que habrá dejado huella, y quitarla capa de
hierba aplastada hasta una profundidad de unos 5-6 cm.
2 Base de solado
•
Extender una capa de grava con el doble objeto de
uniformar el suelo y garantizar su estabilidad. Se aconseja
disponer una capa de 3 cm de grava por lo menos, con una
granulometr
ía superior a los 4 mm.
3 Colocación de las losas
•
Posicionar la placa de manera que quede 0,5-1 cm por
debajo del terreno, para evitar que se formen desniveles en
la super
ficie del caminito.
•
Sirviéndose de un martillo de goma, compactar los bordes
para que la losa quede a nivel con el terreno.
4 Realización de las juntas
•
Se recomienda colocar las losas dejando unas juntas
adecuadas al efecto estético que se persiga.
Инструкция по сухой укладке на траву
1 Подготовка подстилающего слоя
•
Положите плиты на землю и выберите их расположение.
Если выполняется дорожка, то определите среднюю
длину шага, и расположите плиты на равномерном
расстоянии друг от друга.
•
Вырежьте лопатой периметр каждой плиты.
•
Поднимите плиту и снимите вырезанны
й слой дерна
толщиной 5-6 см.
2 Основа
•
Насыпьте слой щебня для достижения двух целе
й:
придание равномерности подстилающему слою и
обеспечение его прочности. Рекомендуется насыпать
щебень размером более 4 мм. Толщина слоя щебня
должна составлять не менее 3 см.
3 Укладка плит
•
Уложите плиту так, чтобы она находилась на 0,5-1 см
ниже грунта, чтобы не создавать перепадов уровня на
поверхности дорожки.
•
Утрамбуйте края резиновым молотком для выравнивания
плиты относительно грунта
4 Выполнение швов
•
Мы рекомендуем укладывать плиты с такими швами,
которые будут соответствовать необходимому
эстетическому результату.
1
2
194
195
3
4

