0
9
RACCORDI A COMPRESSIONE CON O-RING PER TUBO PE/PEHD/PE
X
COMPRESSION FITTINGS WITH O-RING FOR PE/PEHD/PEX PIP
E
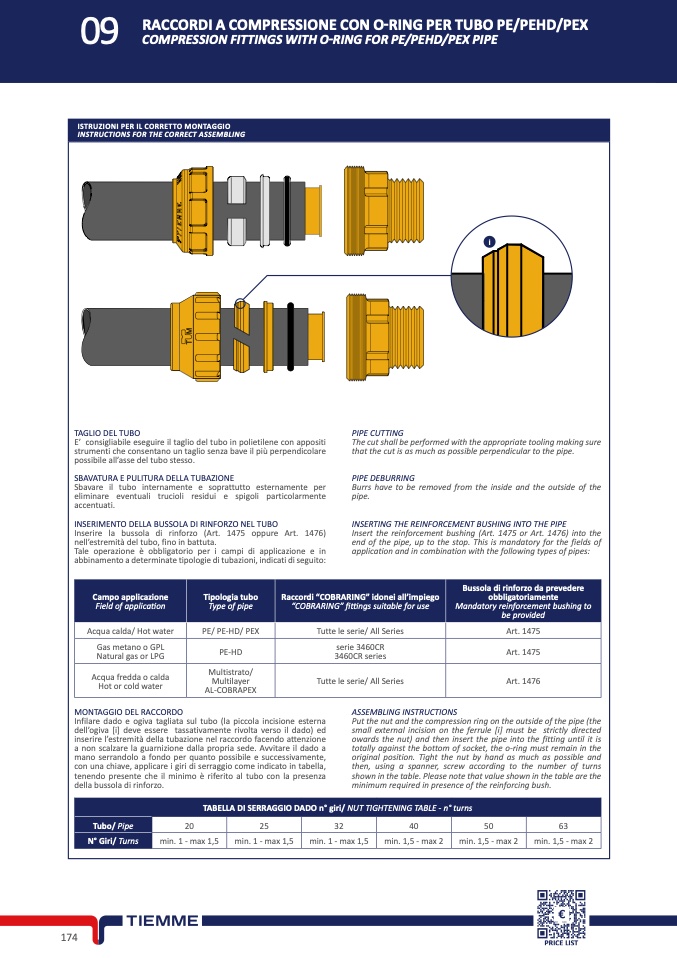
ISTRUZIONI PER IL CORRETTO MONTAGGIO
INSTRUCTIONS FOR THE CORRECT ASSEMBLING
i
TAGLIO DEL TUBO
E’ consigliabile eseguire il taglio del tubo in polietilene con appositi
strumenti che consentano un taglio senza bave il più perpendicolar
e
possibile all’asse del tubo stesso.
Sbavare il tubo internamente e soprattutto esternamente pe
r
spigoli
particolarmente
PIPE CUTTIN
G
The cut shall be performed with the appropriate tooling making sur
e
that the cut is as much as possible perpendicular to the pipe.
SBAVATURA E PULITURA DELLA TUBAZION
E
eliminare eventuali trucioli residui e
accentuati.
INSERIMENTO DELLA BUSSOLA DI RINFORZO NEL TUBO
Inserire la bussola di rinforzo (Art. 1475 oppure Art. 1476)
nell’estremità del tubo, fino in battuta.
Tale operazione è obbligatorio per i campi di applicazione e
in
abbinamento a determinate tipologie di tubazioni, indicati di seguito:
PIPE DEBURRIN
G
Burrs have to be removed from the inside and the outside of th
e
pipe.
Insert the reinforcement bushing (Art. 1475 or Art. 1476) into th
e
end of the pipe, up to the stop. This is mandatory for the fields of
application and in combination with the following types of pipes:
INSERTING THE REINFORCEMENT BUSHING INTO THE PIPE
Campo applicazion
e
Field of applica
tio
n
Tipologia tubo
Type of pipe
Raccordi “COBRARING” idonei all’impiego
“COBRARING” fittings suitable for us
e
Bussola di rinforzo da preveder
e
obbligatoriamente
Mandatory reinforcement bushing to
be provide
d
Acqua calda/ Hot water
PE/ PE-HD/ PEX
Tutte le serie/ All Series
Art. 1475
Gas metano o GPL
Natural gas or LPG
PE-HD
3460CR series
serie 3460C
R
Art. 1475
Acqua fredda o cald
a
Hot or cold water
Multistrato
/
Multilayer
AL-COBRAPE
X
Tutte le serie/ All Series
Art. 1476
MONTAGGIO DEL RACCORDO
Infilare dado e ogiva tagliata sul tubo (la piccola incisione estern
a
dell’ogiva [i] deve essere tassativamente rivolta verso il dado) e
d
inserire l’estremità della tubazione nel raccordo facendo attenzion
e
a non scalzare la guarnizione dalla propria sede. Avvitare il dado a
mano serrandolo a fondo per quanto possibile e successivamente
,
con una chiave, applicare i giri di serraggio come indicato in tabella,
tenendo presente che il minimo è riferito al tubo con la presenz
a
della bussola di rinforzo
.
ASSEMBLING INSTRUCTIONS
Put the nut and the compression ring on the outside of the pipe (th
e
small external incision on the ferrule [i] must be strictly directed
owards the nut) and then insert the pipe into the fitting until it is
totally against the bottom of socket, the o-ring must remain in the
original position. Tight the nut by hand as much as possible an
d
then, using a spanner, screw according to the number of turns
shown in the table. Please note that value shown in the table are th
e
minimum required in presence of the reinforcing bush.
TABELLA DI SERRAGGIO DADO n° giri/ NUT TIGHTENING TABLE - n° turn
s
Tubo/ Pipe
20
25
32
40
50
6
3
N° Giri/ Turns
min. 1 - max 1,5
min. 1 - max 1,5
min. 1 - max 1,5
min. 1,5 - max 2
min. 1,5 - max 2
min. 1,5 - max 2
17
4
PRICE LIST

