08
RACCORDI A PRESSARE PER TUBO PEX “COBRAPEX“
PRESS-FITTINGS FOR PEX PIPE “COBRAPEX“
ISTRUZIONI PER IL CORRETTO MONTAGGIO DAL Ø40 AL Ø6
3
INSTRUCTIONS FOR THE CORRECT ASSEMBLING FROM Ø40 TO Ø6
3
1
2
3
4
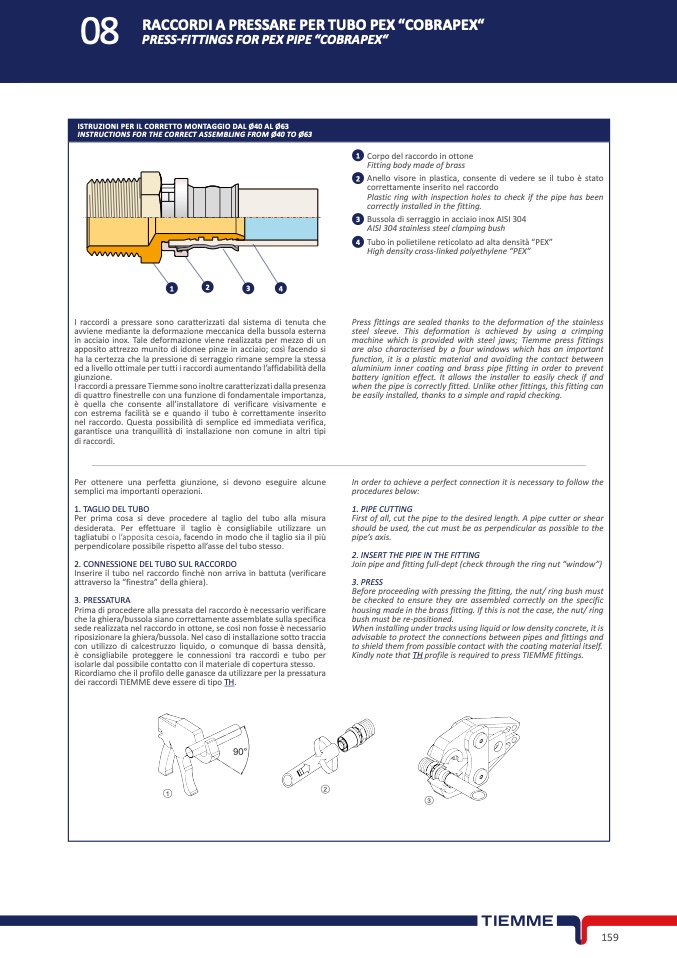
Corpo del raccordo in ottone
Fitting body made of bras
s
Anello visore in plastica, consente di vedere se il tubo è stat
o
correttamente inserito nel raccordo
Plastic ring with inspection holes to check if the pipe has bee
n
correctly installed in the fitting.
Bussola di serraggio in acciaio inox AISI 304
AISI 304 stainless steel clamping bush
Tubo in polietilene reticolato ad alta densità “PEX
”
High density cross-linked polyethylene “PEX
”
1
2
3
4
I raccordi a pressare sono caratterizzati dal sistema di tenuta ch
e
avviene mediante la deformazione meccanica della bussola estern
a
in acciaio inox. Tale deformazione viene realizzata per mezzo di u
n
apposito attrezzo munito di idonee pinze in acciaio; così facendo si
ha la certezza che la pressione di serraggio rimane sempre la stessa
ed a livello ottimale per tutti i raccordi aumentando l’affidabilità dell
a
giunzione.
I raccordi a pressare Tiemme sono inoltre caratterizzati dalla presenza
di quattro finestrelle con una funzione di fondamentale importanza,
è quella che consente all’installatore di verificare visivamente e
con estrema facilità se e quando il tubo è correttamente inserit
o
nel raccordo. Questa possibilità di semplice ed immediata verifica,
garantisce una tranquillità di installazione non comune in altri tip
i
di raccordi.
Press fittings are sealed thanks to the deformation of the stainless
steel sleeve. This deformation is achieved by using a crimpin
g
machine which is provided with steel jaws; Tiemme press fitting
s
are also characterised by a four windows which has an important
function, it is a plastic material and avoiding the contact between
aluminium inner coating and brass pipe fitting in order to preven
t
battery ignition effect. It allows the installer to easily check if an
d
when the pipe is correctly fitted. Unlike other fittings, this fitting can
be easily installed, thanks to a simple and rapid checking.
Per ottenere una perfetta giunzione, si devono eseguire alcune
semplici ma importanti operazioni.
1. TAGLIO DEL TUBO
Per prima cosa si deve procedere al taglio del tubo alla misura
desiderata. Per effettuare il taglio è consigliabile utilizzare un
tagliatubi o l’apposita cesoia, facendo in modo che il taglio sia il pi
ù
perpendicolare possibile rispetto all’asse del tubo stesso.
2. CONNESSIONE DEL TUBO SUL RACCORD
O
Inserire il tubo nel raccordo finchè non arriva in battuta (verificar
e
attraverso la “finestra” della ghiera)
.
3. PRESSATURA
Prima di procedere alla pressata del raccordo è necessario verificar
e
che la ghiera/bussola siano correttamente assemblate sulla specific
a
sede realizzata nel raccordo in ottone, se così non fosse è necessario
riposizionare la ghiera/bussola. Nel caso di installazione sotto traccia
con utilizzo di calcestruzzo liquido, o comunque di bassa densità
,
è consigliabile proteggere le connessioni tra raccordi e tubo pe
r
isolarle dal possibile contatto con il materiale di copertura stesso.
Ricordiamo che il profilo delle ganasce da utilizzare per la pressatura
dei raccordi TIEMME deve essere di tipo TH.
In order to achieve a perfect connection it is necessary to follow th
e
procedures below
:
1. PIPE CUTTIN
G
First of all, cut the pipe to the desired length. A pipe cutter or shea
r
should be used, the cut must be as perpendicular as possible to th
e
pipe’s axis
.
2. INSERT THE PIPE IN THE FITTIN
G
Join pipe and fitting full-dept (check through the ring nut “window”)
3. PRES
S
Before proceeding with pressing the fitting, the nut/ ring bush must
be checked to ensure they are assembled correctly on the specifi
c
housing made in the brass fitting. If this is not the case, the nut/ rin
g
bush must be re-positioned.
When installing under tracks using liquid or low density concrete, it i
s
advisable to protect the connections between pipes and fittings an
d
to shield them from possible contact with the coating material itself
.
Kindly note that TH profile is required to press TIEMME fittings
.
90°
2
1
3
159

